Earlier in the week I mentioned the great Tumblr blog Movie Bar Code, which renders films as abstract visual compressions. I also mentioned that I’d found some instructions describing how to make your own movie bar codes.
I downloaded an HD version of one of my favourite films, Raiders of the Lost Ark, and set to work. The instructions involved using the command line in Terminal, Apple’s Unix shell. This is unfamiliar territory for me, and about as close to actual programming as I’ll probably ever come (discounting some excellent work in BASIC when I was 12).
There was a lot of research, trial and error and general fiddling about, but I finally figured out how to make my MacBook generate a movie bar code. Building on Mr. Reid’s handy instructions, here are the steps I undertook:
- Use VLC to capture 1500 to 2000 frames from the movie. I first captured every 90th frame, and then (for reasons which will become apparent below) I did every 150th frame. Here’s the command I used for that (after aliasing VLC in Terminal):
vlc /Users/darren/Downloads/movie.mkv --video-filter=scene --scene-format=jpg
--scene-prefix=movie --scene-ratio=150 --scene-height=1080 --scene-width=1920
- In Adobe Photoshop, create an automated batch task to manipulate the images as desired. I’ll include a few examples below, but I ultimately choose to blur the original frames for a more even tone, and then shrink them to three pixels wide. I also cropped out the letterbox black bars.
- Use Graphic Converter to adjust the numbering of the images. It’s important that all the images have the same number of digits in them, as in 000001.jpg up to 165322.jpg. Otherwise, ImageMagick won’t arrange the images in the correct order.
- Use ImageMagick to generate the final barcode. Here’s the command I used for that:
montage -geometry +0+0 -tile x1 *.jpg barcode.jpg
It’s not rocket science, but if you’re not command line-friendly, it will take some experimentation. Don’t give up, though, as I’m really happy with the final result.
Compressed, cropped or blurred?
Here are a few versions that I created before settling on my fifth attempt.
This is the second version I created–the first one taught me about numbering my source images correctly. In this case, I just shrunk the images to one pixel wide. Click for a larger version.

I didn’t like those little horizontal lines you can see about halfway along the image. They’re from this scene, where Indy surveys a dig site.
As an experiment, I tried cropping the images to a one-pixel width instead of compressing them. As you can see, the result is much busier and less pleasing to the eye.

I ultimately decided that I wanted a longer shape, so I ended up collecting fewer frames (1 per 150 frames) and making each three pixels wide. I also blurred the source images–the result is a much smoother quality to the lines.

The resulting images is brighter than I would have thought, and less brown. Those really familiar with Raiders will be able to pick out a couple of the distinctive moments–“Start the plane, Jock!” from early in the film, and Indy and the team dig for the entrance to the Ark chamber. It’s easy to see where these moments fit on the bar code.
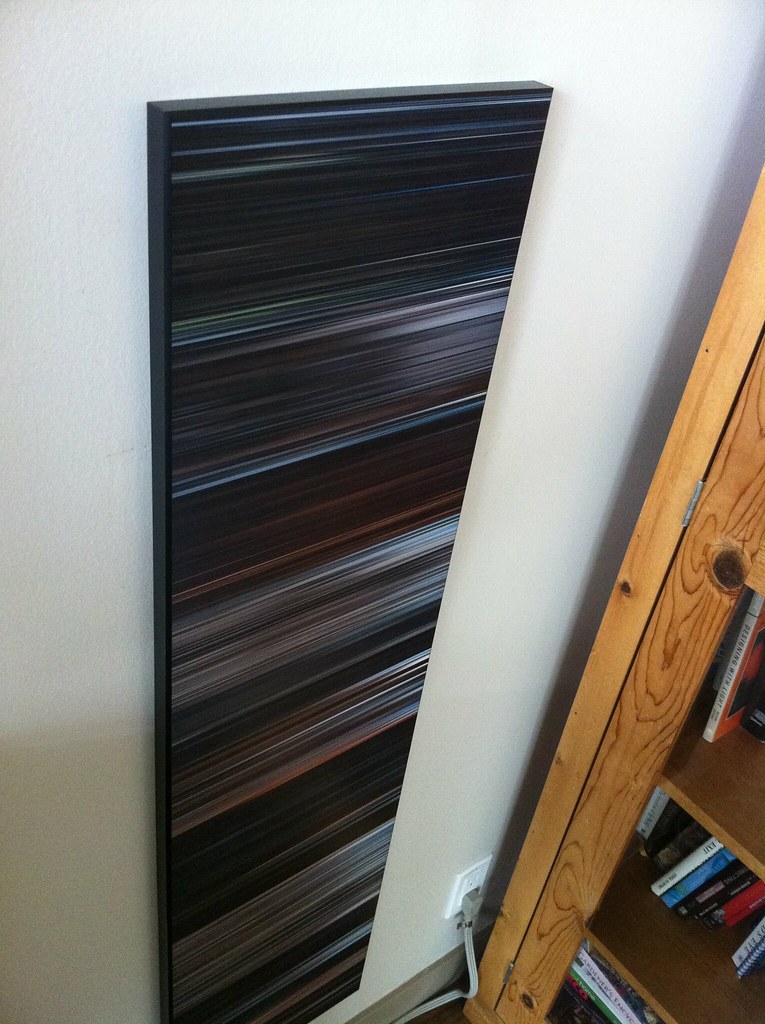
I’m going to get this last version printed, and see how it looks hanging on my wall.
UPDATE, March 29, 2011: Here’s what the final version looks like.

Please publish the photoshop actions as gists on github.com (all you have to do is join github and then copy and paste the actions; assuming the actions have a text format; I know nothing about Photoshop and its crazy proprietary actions of doom 🙂 ! )
https://gist.github.com/ (no git knowledge required!)
this is great and a different art form. I won’t even try…
how do you create the automated batch task to resize all the images? I’m using CS5, and I don’t know how to
I have a director friend and I want to do one of these to his latest feature film. Can you build the image file for me? If so, how much?
Email me,
-Spaz@spazticproductions.com
Hi there! Would you mind if Ι sharе yоuг
blog with my mуspace group? There’s a lot of folks that I think would really appreciate your content. Please let me know. Thank you